Thursday, 30 October 2014

Completed the Roof

Its been so long between activity on the tiny house.

I injured my finger quite severely at work and required surgery. The end result being no activity on the build until now.

Placed the last section of insulation and roofing iron.


Not that the fascia board was cut extra long and will be trimmed to length at a later date.
 

Sunday, 21 September 2014

Roof Insulation & Cladding

I was going to fit traditional sisalation paper however after some research it became apparent that blue and silver sisalation is old technology and has been replaced with bubble wrap like insulation. 

A roll of "Air Cell" insulation and aluminum tape were purchased off ebay. The plan is to also use it on the walls.


The insulation was cut to length on the ground and secured with shade cloth "nails".


Underside of the Air Cell


Air Cell insulation was overlapped and the join covered with aluminum tape. Note that the Air Cell overhangs the lower roofing batten so that condensation can drip off without wetting ie rotting, the batten. 


As I am constructing the tiny house without assistance, I have had to develop ways to compensate for lack of hands. In the case of fitting the sheets of roofing iron, blocks were temporarily nailed bottom roofing batten to stop them sliding down while securing them.


The first sheet of roofing fitted.

. . . . . and the second.

Saturday, 20 September 2014

Gables

Batten screws being fitted to battens.


The barge board will be secured via the battens and in order to stop flex, blocks of wood are cut to butt against the last rafter and back of the barge board. The picture below shows the barge board prior to fitting. Note that the end rafter has been infilled with framing and the rectangular framing will be were the loft window will be installed.

The angle of the cut for the top of the barge board should be the same as the angle that the rafter was cut. Im my case 45 degrees.


Barge board fitted and held in place with batten screws.

Front view of the barge board that forms the gable and eve.

View of where the eve lining will be fitted.

Saturday, 6 September 2014

Color Bond Commercial Building

Was driving past a color bond commercial building so stopped into see how the corners were handled.


Roof Battens

The roof battens were placed over length and 3 per side. They were positioned straight by using a string line and held in place by nails. 


View of the fitted battens from above.

Note that batten screws were subsequently using to secured via batten screws.

Batten screws will tend to split wood if the wood is not pre-drilled and they are also hard on drills due to the torque required to screw them.

Batten is held in place at the ridge board via skew nailing and hoop iron and clout nails.


The battens have been trimmed in preparation for the fitting of the gable ends.

Saturday, 30 August 2014

Rafters and Ridge Board

Having never done this before it was a case of phoning a builder friend to ask a few questions.

For terminology, have a look at:
http://collections.infocollections.org/ukedu/uk/d/Jgtz006e/14.3.html

 The advice went as follows.

1. In order to work out the location (& depth) of your birds mouth cut, cut over length rafters at the desired roof pitch. In my case the pitch is 45° to maximise head space in the loft.
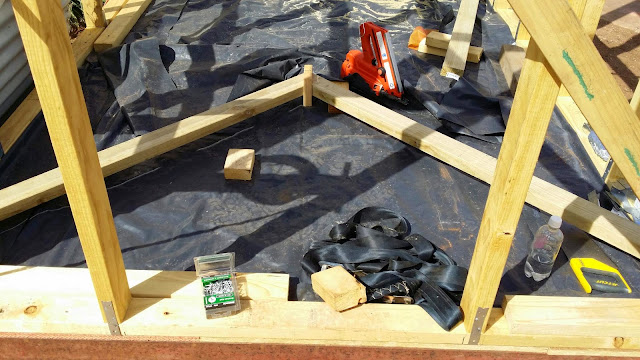
2. Cut a short length of the ridge board and stand it on its end (see left of the orange nail gun).
3. Place the length rafters horizontally on the bottom plate to replicate how they would look when placed on the roof ie along the centre line of the two long walls.
4. Mark the desired overhang of the rafter.
5. Mark the position where the rafters contact the edge of the wall. This is where a "birds mouth" cut will be made. Make the depth of birds mouth cut with consideration to maintaining the structural integrity of the rafter.
6. Cut the birds mouth and reposition back on the ground as per step 3.
7. Measure the distance from the bottom plate to the bottom of the ridge board and write it down.

Before cutting more rafters, the ridge board should be installed to check that the two rafters fit.


To position the ridge board, nail a long length of timber to one side of the centerline of the frame. This structure will be removed later however it needs to be firmly secured.

Position a block of wood at the height of the ridge board as noted in Step 7 above.
The ridge board will rest on this block. Repeat this for the other end of the tiny house.


Position the ridge board on the blocks and clamp. Loose fit the two rafters that were previously cut and make any necessary adjustments in the position of the birds mouth, the angle that the rafter meets the ridge board or the height of the ridge board.

Note that I wanted an eve at both ends of the tiny house so the ridge board is over length.


Cut additional rafters as required. When cutting and fitting rafters, the assumption is that the walls are straight, level, plumb. Note that the rafters will want to spread or push the two long walls apart.
In order to minimize the potential of spreading, the loft bearers were fitted prior to the installation of the rafters.

The long length of timber that can be seen in the photo below is a plant that was worked off when fitting the rafters. Much easier than working off the top of a ladder. 

Construction was during an Australian winter and due to shorter daylight hours the majority of work was undertaken on the weekends. Black builders plastic was placed over the whole structure to stop the chip board floor from getting unnecessarily wet.


Internal view of the rafters. This was the first time that the internal space of the tiny house could be "felt". Note the working plank.


Sunday, 10 August 2014

Sub-frame Construction - 3

In these photos you will see that the whole frame has been moved away from circular bulb garden bed where it was originally placed and it has now been moved and placed on levelled concrete blocks.

The area beneath the concrete block was dugout to a depth of 400mm and crushed rocked placed and compacted with the blunt end of a crow bar. In order to stop the double concrete blocks from moving away from each other, they were glued utilising "liquid nails".

Sub-frame has been nogged out with additional floor joist placed at 450mm centers and whole structure is quite rigid.

Love the nail gun.
 

Concrete blocks have been liquid nailed together and are placed on compacted crushed rock.